Kubernetes has a lot of features and deployment options for running containers. One of these is the DaemonSet. In this blog post, we’ll discuss what DaemonSets are, what they can be used for, and how to create and update them.
In this blog:
What is a DaemonSet?
A Kubernetes DaemonSet is a container tool that ensures that all nodes (or a specific subset of them, but we’ll get to that later) are running exactly one copy of a pod. DaemonSets will even create the pod on new nodes that are added to your cluster!
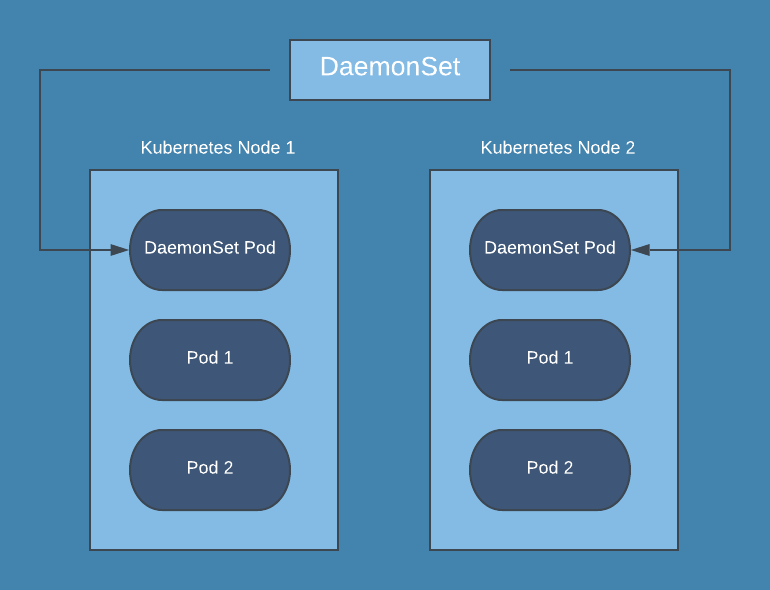
When using Kubernetes, most of the time you don’t care where your pods are running, but sometimes you want to run a single pod on all your nodes. For example, you might want to run fluentd on all your nodes to collect logs. In this case, using a DaemonSet tells Kubernetes to make sure there is one instance of the pod on nodes in your cluster.
How to create a DaemonSet
Like everything else in Kubernetes, DaemonSets can be configured using a YAML file:
apiVersion: apps/v1
kind: DaemonSet
metadata:
  name: my-daemonset
  namespace: my-namespace
  Labels:
    key: value
spec:
  template:
    metadata:
      labels:
        name: my-daemonset-container
    ...
  selector:
    matchLabels:
      name: my-daemonset-container
The YAML file consists of the following parts:
- apiVersion (required)
- kind (required) - should be DaemonSet
- metadata (required)
- spec.template (required) - a pod definition for the pod you’d like to run on all nodes
- spec.selector (required) - a selector for pods managed by the DaemonSet. This value must be one of the labels specified in the pod template. In the example above, the selector was for name: my-daemonset-container, which was defined in the template and used in the selector. This value cannot be changed after you’ve created the DaemonSet without orphaning the pods that were created by the DaemonSet.
- spec.template.spec.nodeSelector - can be used to run on only a subset of the nodes that match the selector
- spec.template.spec.affinity - can be used to run on only a subset of the nodes that match the affinity
Once you’ve got the configuration complete, create the DaemonSet in your cluster by doing the following:
kubectl apply -f daemonset.yamlYou should see the specified pod running on each node!
Communicating with a DaemonSet
Sometimes you’ll need to send data from your other pods to the DaemonSet pod running on the node. For example, you may want to send metrics data to a monitoring pod. In these cases, you have two options:
- Specify hostPort in the DaemonSet’s pod spec to expose it on the node. You can then communicate with it directly by using the IP of the node it is running on.
- Create a service with the same pod selector as the DaemonSet and then use the service to reach your DaemonSet. The drawback of the service method is that a random DaemonSet pod will receive the request, meaning the request may go over the network instead of staying on the same node as the requesting pod.
How to update a DaemonSet
There are a couple of ways that you can update your DaemonSet. The first is to edit the DaemonSet directly with the following command:
kubectl edit ds/NAMEThis command will allow you to edit the DaemonSet’s configuration in the command line, and will apply the changes when you are done. However, we don’t recommend this method, as it doesn’t lend itself well to version control.
Instead, we recommend that you just update the original configuration file and then use the same command you used for creation. This allows you to keep track of changes in version control:
kubectl apply -f daemonset.yamlOnce you’ve sent updates to Kubernetes using either of the two methods, the DaemonSet is updated according to your update strategy, which is set with the spec.updateStrategy.type option. Here are the possible options and how they apply your updates:
OnDelete
Kubernetes will create new pods that match your updated DaemonSet only after you manually delete the old pods.
RollingUpdate
RollingUpdate is the default update strategy in Kubernetes 1.12+.
Kubernetes automatically deletes old pods and then creates new pods that match your updated DaemonSet. By default, DaemonSet pods are replaced one at a time so you don’t have any unavailability, but you can change spec.updateStrategy.rollingUpdate.maxUnavailable if you want to update more than one node at a time. You can also change spec.minReadySeconds to give your pod some time to initialize before it receives requests.
As an example, the following config performs a rolling update where two nodes are updated at a time and wait for 30 seconds after they enter the READY state before receiving requests:
spec:
  updateStrategy:
    type: RollingUpdate
    rollingUpdate:
      maxUnavailable: 2
      minReadySeconds: 30
When you apply the update, you can watch its status by using the following command:
kubectl rollout status ds/<daemonset-name>Click here for more on Kubernetes RollingUpdate.
Monitoring a DaemonSet
DaemonSets provide a lot of value if you need a specific pod on every node. They are easy to create and update, and are a great feature in Kubernetes.
However, like the rest of Kubernetes, they can be hard to monitor with traditional tools. If you are looking for a monitoring solution for Kubernetes, consider Blue Matador. Blue Matador automatically checks for over 25 Kubernetes events out-of-the-box. We also monitor over 20 AWS services in conjunction with Kubernetes, providing full coverage for your entire production environment with no alert configuration or tuning required.