Kubernetes has a lot of features and deployment options for running containers. One of these is the service. In this blog post, we’ll discuss what Services are, what they can be used for, and how to create them.
What is a service in Kubernetes?
A Kubernetes service groups a set of pods together and makes them accessible through the DNS name of the service. This is useful because pods can be created and destroyed constantly, and without a service to make these pods accessible as a network service, you would need to implement a network discovery service to make calls between pods.
Luckily, Kubernetes makes it really easy to define a service. All you need is some way to select the pods that belong to your service.
How to create a Kubernetes service
Like everything else in Kubernetes, services can be configured using a YAML manifest:
apiVersion: v1
kind: Service
metadata:
  name: user-service
spec:
  selector:
    app: user
  ports:
  - protocol: TCP
    port: 80
    targetPort: 9376
The YAML file consists of the following parts:
- apiVersion
- kind: should be service
- metadata.name: the name of the service. This will be the DNS name of the Service when it is created.
- spec.selector: what pods should be included in the Service. In this case, any pod with the label app=user will be added to the service.
- spec.ports: list of port configurations. Each port configuration consists of the following pieces:
- protocol: the network protocol to use with the port
- port: the port that incoming traffic goes to
- targetPort: the port on the pod that traffic should be sent to
Once you’ve got the configuration complete, create the service in your cluster by doing the following:
kubectl apply -f service.yamlTo check that your service is running, you can execute the following command:
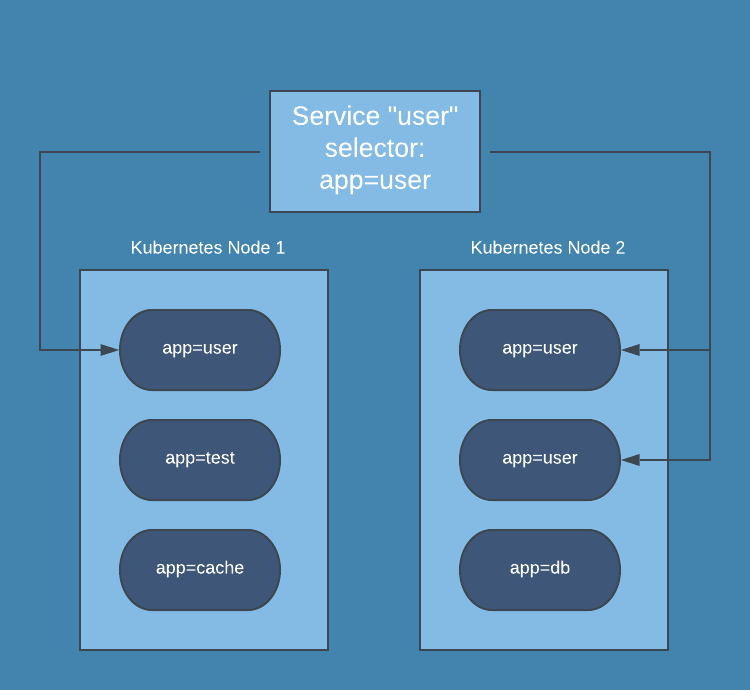
kubectl get servicesYou should see your new service in the list of services returned by this command. You can now access your pods using the service. In this example, the traffic for the user service might look like this in your cluster:
How to communicate with a Kubernetes service
Of course, the whole purpose of creating a service is to make it possible to access a network service without having to know the pods it is running on. If you’re running Kubernetes 1.11 or higher, your cluster will automatically have CoreDNS installed, which will allow you to access your service by using the service’s name. Otherwise, you’ll have to install CoreDNS or kube-dns as an addon.
At this point, your service is all set, and you’ll be able to access in other parts of your application!
Types of services in Kubernetes
There are four types of services that are defined by how they expose the service outside the cluster. The service type is set by using one of the following values for spec.type:
- ClusterIP (default) - The service is not exposed outside the cluster, but can be addressed from within the cluster.
- NodePort - The service is exposed on a port on every node in the cluster. The service can then be accessed externally at <node_ip>:<node_port>. When using NodePort services you must make sure that the selected port is not already opened on your nodes.
- LoadBalancer - The service is exposed as a load balancer in the cluster. LoadBalancer services will create an internal Kubernetes Service that is connected to a Load Balancer provided by your cloud provider (AWS, GCP, or Azure). This will create a publicly addressable set of IP addresses and a DNS name that can be used to access your cluster from an external source.
- ExternalName - The service is mapped to a DNS name, not to a typical selector such as my-service or cassandra. You specify the CNAME with the spec.externalName parameter.
Next steps
Services make it really easy to create network services in Kubernetes. Each service can be backed with as many pods as needed without having to make your code aware of how each service is backed.
However, it can be hard to monitor Kubernetes with traditional tools. If you are looking for a monitoring solution, consider Blue Matador. Blue Matador automatically checks for over 25 Kubernetes events out-of-the-box. We also monitor over 20 AWS services in conjunction with Kubernetes, providing full coverage for your entire production environment with no alert configuration or tuning required. Learn more Kubernetes best practices at our Learn Kubernetes page.