What is Helm?
Helm is a popular open-source tool used to manage and configure your Kubernetes cluster. Basically, it is a package manager (think Homebrew or NPM) built for Kubernetes. It helps automate processes like installing, configuring, upgrading, and removing items. This post will give you a brief introduction to Helm and how it might help you manage your Kubernetes cluster.
Learning the basic terminology and objects of Helm
Just like all good explanations of how a technology works, we promise we’ll show you an awesome diagram—because we all think diagrams make us smarter—that shows at a high level how Helm interacts with a Kubernetes cluster. Before we do that, though, let’s lay the foundation with some basic Helm terminology.
Helm is made of two elements: a client (Helm) and a server (Tiller). The server element (Tiller) runs inside your Kubernetes cluster. Now for the definitions:
- Helm: A command-line interface (CLI) that helps you define, install, and upgrade your Kubernetes application using charts.
- Charts: Helm’s application package format. A chart is a collection of files that describe a group of Kubernetes resources. You can read more about them in Helm’s documentation.
- Chart repository: A location where you can store and share packaged charts. More information can be found here.
- Release: After you install a chart, Helm creates a release to track that installation. You may even install the same chart multiple times to create as many releases as you need.
- Tiller: The Helm server-side template engine. This runs in a pod in your Kubernetes cluster and processes the chart to create Kubernetes resource manifests as YAML files.
Now we can show you that pretty visual to show how these pieces fit together in your cluster.
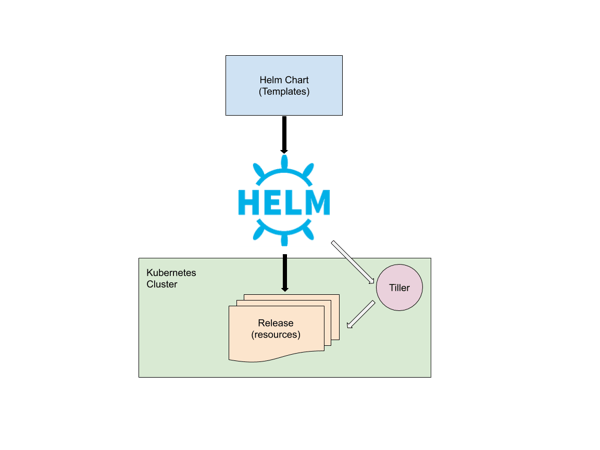
All right, now that we’ve stimulated your visual learning powers, let’s explain more.
Basically, you use Helm to create charts (which is a stack of preconfigured files describing what Kubernetes resources you want to deploy in your cluster), which you then install into your cluster. The Tiller in Helm then runs in your cluster and implements the chart applying YAML manifest files.
Why you should use Helm
There are a few reasons we think Helm is a good way to manage your Kubernetes cluster.
First, Helm can make deployments easier, and it builds a repeatable, standardized process. That can boost your speed to deployment and reduce errors.
Another pretty cool thing about Helm is its library of Helm charts. These charts are ready to use and can be a great way to benefit from someone else’s hours of work.
Lastly, we like Helm because, after the initial setup, Helm makes it faster to get started when using third-party projects that have Helm charts capabilities. Keep in mind that Helm isn’t the only way to manage your Kubernetes cluster and configuration settings.
Why you shouldn’t use Helm
A couple reasons you shouldn’t use Helm: If the added complexity might be overkill for your environment.
Also, the Tiller can feel like another layer of complexity for authorization and additional TLS certificates to maintain. The Tiller process must keep running for your configuration to stay in sync.
If you have a small environment it might be easier to just keep your Kubernetes manifest files in git to track changes and deploy almost in the same way Helm does.
Another downside to the Tiller: it introduces another single point of failure in your cluster. If the Tiller is down, you won’t be able to make updates to your resources. Using standard manifests eliminates this issue. We know we said above that using the community Helm charts is cool, but keep in mind that many of them are far from perfect and require work on your end to really make them functional for your cluster.
Setting up Helm
If you decide that Helm is right for you, getting started is pretty straightforward. According to Helm, you need three things in place before you start.
First, you obviously need a Kubernetes cluster.
Second, you’ll have to spend some time deciding what security configurations you’ll want. Helm has provided a good resource to walk you through securing your Helm installation. You’ll need to think about who on your team has access to Helm as well as the security implications of having Tiller running in one of your Pods.
Third, You’ll need to install and configure Helm. Here is a pretty handy quickstart guide.
Conclusion
We hope this helps give a good overview of Helm and helps you see some of the pros and cons of using it. If you opt not to use Helm, you should still use some method for controlling and tracking the history of your Kubernetes configuration changes.