Note: This is the third post in our series on properly deploying an app to AWS with the least effort. Our other posts cover:
- Getting started
- Preventive measures
- App security (this post)
- Route 53 and DNS explained
- App automation and optimization
AWS security is an ongoing battle that you must address during every release, every change, and every CVE.
When you’re first launching your production application, it’s impossible to check all the boxes; you simply don’t have the time. Until your application gets more adoption, you only have the time to do the bare essentials of security.
Here's what you should do, at minimum: complete the security assessment in the IAM console, set up and use private subnets in VPC, and enable Amazon’s automated security agent, GuardDuty.
| Got any plans for monitoring your soon-to-be-deployed app? Blue Matador is the fastest, easiest way to monitor AWS. Learn more > |
1. Take the security assessment in the AWS IAM console.
IAM stands for identity and access management, and in AWS, it’s the only way to limit access and to create more user accounts. There are two key concepts in IAM: users and roles. An IAM user is a person with credentials. That person can have specific access policies or belong to a group with access policies. An AWS IAM role can be used by a service (think EC2) or another AWS account to access your resources. For example, you can grant a role to Blue Matador to monitor your infrastructure for anomalies.
To see the security assessment, navigate in the console to the IAM service. On this dashboard, if you haven’t completed the assessment, you’ll see a section for “Security Status” with five different items, as in the image below.
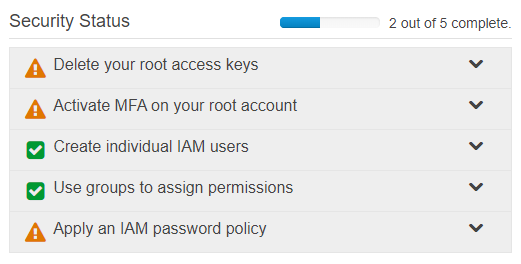
IAM security assessment table found in the AWS console
It may seem a daunting list, but I assure you it’s not only worth completing, but it’s also simple and quick. Let’s go through each of these and explain their importance.
Delete your root access keys.
Your AWS root account is the admin user for your account. It should be locked down the same way you lock down the root account on Linux or the administrator account on Windows.
By default, your root account has access keys that have unrestricted access to AWS APIs. Amazon does this for ease of use, but then immediately recommends against it. With your root keys, a hacker could delete your entire infrastructure, create a new user account for later access, launch new bitcoin mining resources in a different region, and more. You cannot restrict root access keys, but you can replace them with specific IAM users (addressed two sections down) or temporary keys using IAM.
To delete your root access keys, navigate to the root security credentials page and click “Access keys.” Take a moment to make sure that no currently running production application depends on them by looking at the “Last Used” column in the table. Then, delete every row in the table. You won’t need a single root access key.
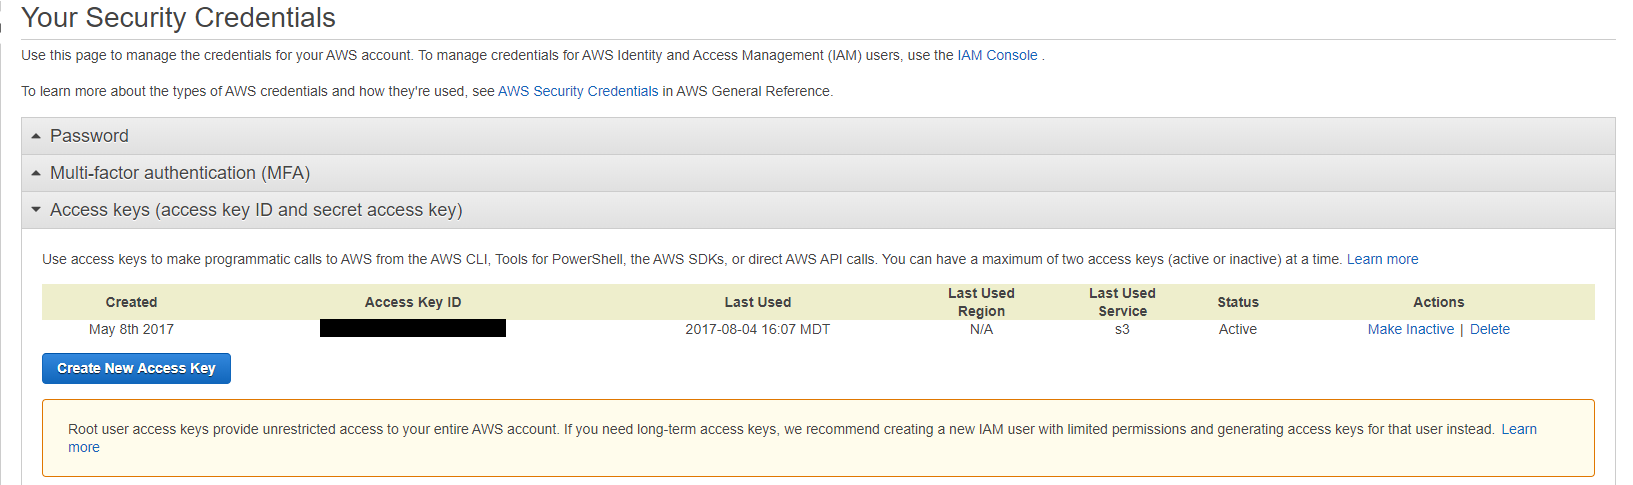
Delete every row in the "Access keys" table
You can verify you did it correctly by revisiting the security assessment on the IAM dashboard.
Activate MFA on your root account.
Your root account should be protected by multi-factor authentication (MFA). If you’re not familiar with MFA, it's a method of securing your account that requires another factor besides your username and password—usually your phone—to log in. It’s a minor annoyance when logging in, adding just a couple seconds to the process. It really gets annoying when switching phones or adding redundant account access (for disaster recovery).
You can make it less annoying by using a smarter MFA app, like LastPass Authenticator, which transfers between mobile devices much more easily. You could also add MFA to your root account and leave it off of your restricted IAM user accounts, reducing the number of daily annoyances.
To enable MFA on the AWS root account, navigate to the root security credentials page and click “Multi-factor authentication (MFA).” Once there, click “Activate MFA” and follow the steps in the wizard. If you want multiple people to have access to the root account (for disaster recovery), make sure all the people are there during the activation process, as they’ll all need to scan the QR code.
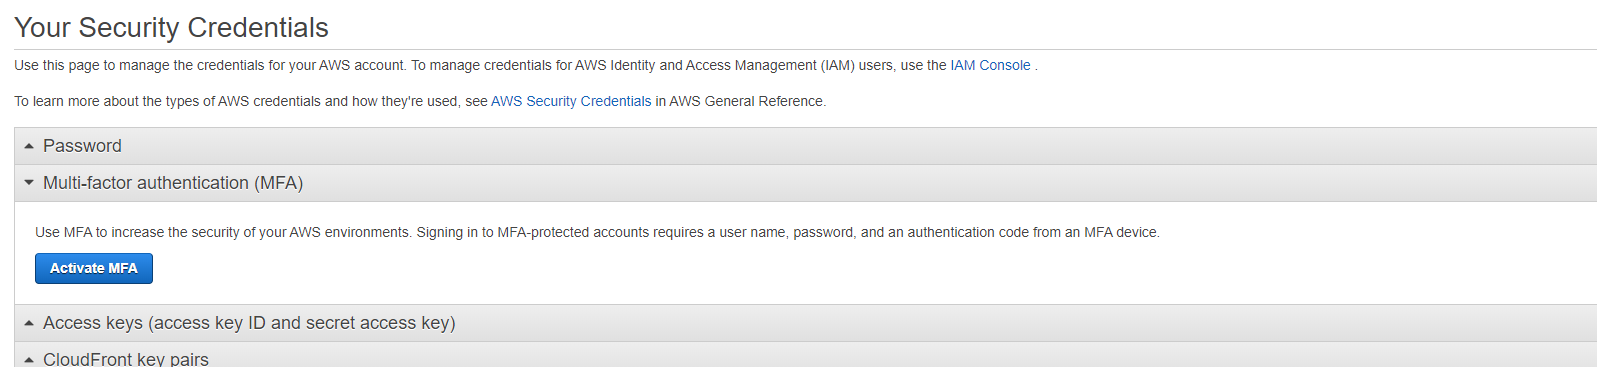
Activate MFA in AWS using the wizard on the "Your Security Credentials" page.
If you've done this correctly, it will be reflected in the Security Assessment on the IAM dashboard.
Create individual IAM users.
Now that your root account is secure, keep it secure by not sharing the username, password, or MFA with anyone else. Every new person who needs access to the AWS console, AWS resources, or the aws-cli should receive it by creating a new IAM user for them specifically. AWS does not charge for IAM users, so there is no need to share credentials.
By creating a new IAM user for each person, you will naturally get a few benefits.
- First, when someone leaves the company or their position, you can revoke their individual credentials without having to change anyone else’s password.
- Second, you can specify an individual level of permissions inside of AWS. For example, you may grant some ops users access to read production databases, but dev users only get read access to staging.
- Third, you’ll get an automatic, identifiable audit trail using CloudTrail. Whenever an API is called, Amazon records which user or role called that API in CloudTrail and keeps it for a definable period.
While creating IAM users, you’ll also see references to IAM roles. These are also entities that you can create, like users, but are reserved for AWS services, other AWS accounts, and third parties like Blue Matador. An IAM role is used to grant permissions for a non-human.
To create IAM users, navigate to AWS IAM users and click “Add User." Then, follow the wizard to specify their username, console vs. API access, and then the exact permissions. The next step will be to place them in user groups, which give them permissions that are more manageable at scale.
You can verify you did it correctly by revisiting the security assessment on the IAM dashboard.
Use groups to assign permissions.
You can specify permissions on individuals, but you’ll likely have an ops group and a dev group. Ops will have full admin permissions, and dev will likely have limited read permissions. Getting more granular is better, but also takes more time. It’s sufficient to create the groups, grant necessary permissions for now, and manage it later as your application grows.
Keep in mind: Only users can belong to groups. Roles must have their own specific permissions set.
To create a group, navigate to AWS IAM groups and click “Create New Group.” Then, follow the wizard to specify the group name and permission policies of that group. After it’s created, you’ll need to go back to your list of users and add them to the newly created group.
Again, you can verify you did it correctly by checking the security assessment on the IAM dashboard.
Apply an IAM password policy.
Thankfully, IAM does allow you to set your own password policy, including required characters, expiration, reuse, and change allowance. Like most of the above steps in the account lockdown, this is a set-it-and-forget-it step that takes only a couple minutes.
Before you make a draconian policy that encourages users to write their passwords on a sticky note and put it on their monitor, you should consider what tools they have available to memorize such a password. If you don’t have a corporate password tool, then you should probably lay off the more inconvenient options. If you’ve got 1password or similar, then feel free to select more options, as it will only serve to enforce the tooling you’ve got in place.
To set an IAM password policy, go to the IAM Account Settings page and click “Set password policy.” Choose from the list of options and click “Save changes.”
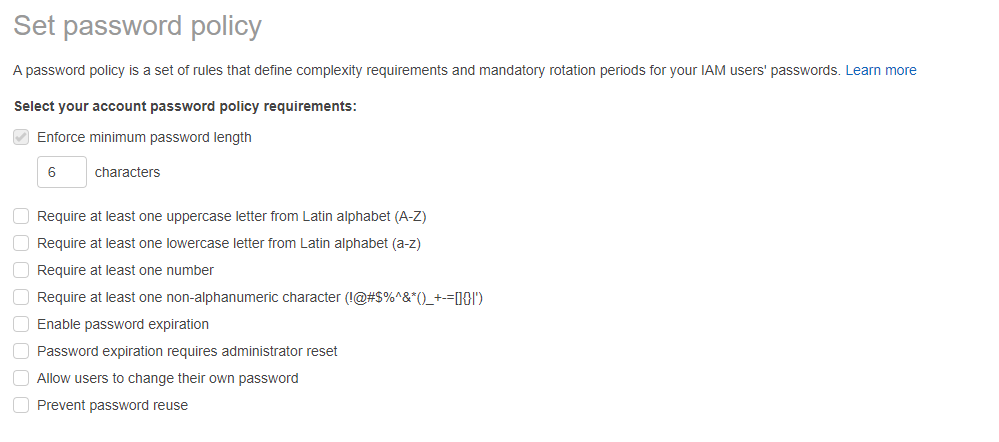
Set a password policy in AWS IAM to protect your account.
The security assessment will reflect whether you've done this correctly.
2. Private subnets in VPC
Back when AWS first came on the scene, all EC2 instances were on the public internet. That included database servers, cache servers, and Active Directory instances. Absolutely everything in AWS had a public IP and was publicly addressable. Even with heavy reliance on security groups (AWS firewalls), this left a lot of users feeling uneasy about using EC2.
In 2009, AWS released Virtual Private Cloud (VPC). Amazon VPC is the missing networking component to EC2 that makes it possible to segregate public vs. private networks and to be more granular about routing rules, VPNs, network ACLs, and the like. Since then, they’ve expanded the offering to include NAT instances, hosted VPNs, and cross-account bridges (called VPC peering connections).
History lesson aside, VPC makes it possible to specify public or private addressability on the public internet.
The logic I’m about to go through is to underscore the fact that it’s very difficult to change the public/private options once you’ve selected them. That’s why I recommend setting up and using private subnets in VPC from the beginning. If you don’t, it’s a large security hole with a terrible migration process ahead. I spoke about my migration experience at AWS re:Invent a few years back—I don’t recommend the migration.
Here's why:
A VPC is just a network, like your home network. It has computers, firewalls, and an internet gateway. Each AWS account can have multiple VPCs. Each VPC can have multiple subnets. Each subnet is a CIDR block (like 192.168.1.0/24) and a number of settings (like publicly vs. privately accessible). The difference between public and private subnets is found primarily in the routing rules.
Every EC2, ELB, and EKS instance in a public subnet needs to have a public IP address, and the routing table will route public traffic through an AWS Internet Gateway (igw). Every EC2, ELB, and EKS instance in a private subnet should not have a public IP address, and the routing table will route public traffic through an AWS NAT Gateway (nat). The NAT provides address translation and acts as a firewall for incoming traffic.
Here is an example diagram of a single AWS VPC with a public subnet and a private subnet. You can see how the public subnet’s route table specifies an internet gateway (igw-), while the private subnet uses a NAT instance (nat-). You may also notice that the public subnet instances all have public IP addresses in addition to their private IP addresses, while the private subnet instances have only the private IP addresses.
You may also note that the NAT server for the private subnet is sitting in the public subnet. It’s important to note that all publicly accessible services need to be in a public subnet. This includes ELB/ALB/NLB/CLB/*LB, NAT gateways, internet gateways, etc. If something isn’t working in your network, check the subnet it’s in.
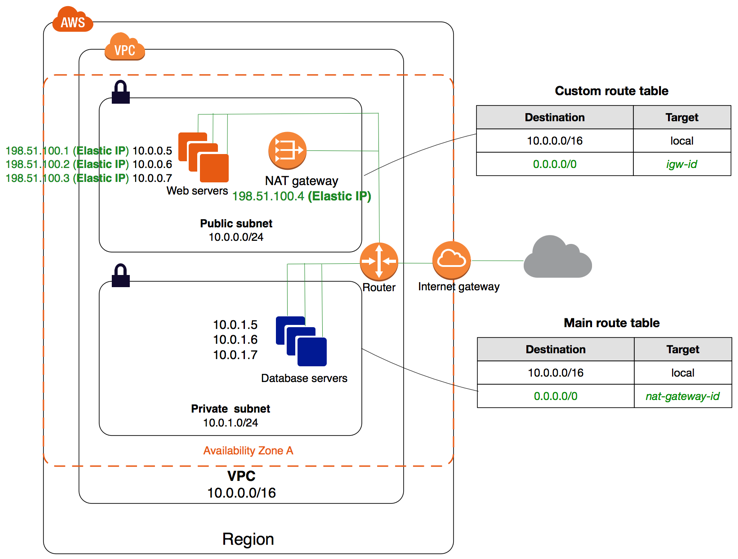
Public and private subnets in an AWS VPC.
Taken from AWS Documentation on VPC with public and private subnets (NAT).
The setup is a little more involved than the IAM security, and won’t fit in this blog post without excessively bloating the topic. If you’re familiar with networking, you could get through it without a tutorial. If you’re new to networking, the whole thing, start to finish, will take less than 20 minutes with the right tutorial. Until I write one, here’s the recommended guide from AWS on how to create a VPC with a public and private subnet.
Bastion hosts
The singular question you should have right now is “If I make my instances private, how will I SSH/RDP into them?” Great question! The answer is by using a bastion host.
(Sure, you could set up a VPN, but that takes days to weeks, complicates your setup, and doesn’t offer any additional benefits if you’re looking to accomplish the bare essentials.)
A bastion host is a simple EC2 instance that lives in a public subnet and has SSH access open to the world (or your specific IP) and can connect on RDP or SSH to any other instance in your VPC.
Simply put, to SSH to a private server, you’ll use an SSH tunnel through the bastion host, with optional SSH agent forwarding. To RDP to a private server, use SSH/putty to the bastion host to forward a port to the private server.
How to set up a bastion host
Here’s a checklist of things you’ll need to do to set up a bastion host.
- Create your public/private subnets in a VPC (check the AWS docs linked above).
- Launch an EC2 instance in the public subnet. This is your bastion host.
- Adjust security groups to open SSH (port 22) to the bastion host from your local IP.
- Test SSH to the bastion host. If it doesn’t work, check your route tables, IP address, selected subnet, and ssh daemon.
- Launch an EC2 instance in the private subnet. This is your private server.
- Adjust security groups to open SSH (port 22) to the private server from the bastion host.
- SSH to the bastion host, and then test SSH from the bastion host to the private server. If it doesn’t work, check your private route tables, IP address, selected subnet, and username/keypair.
Here’s a helpful tutorial on how to use a bastion host to connect to a private server using RDP.
You may also consider setting up SSH agent forwarding. It saves your password on your local machine and then uses that password again to connect to the private server from the bastion.
3. Activate AWS GuardDuty
Amazon’s GuardDuty is the easiest security monitoring tool you’ll ever enable in AWS. Its purpose is to protect your AWS accounts and workloads with intelligent threat detection and continuous monitoring. While I doubt that it’s as good as other third-party tools, it will be good enough to warrant 1 minute of clicking and a negligible price per month.
Here’s how to enable AWS GuardDuty from start to finish.
- Step one: Navigate to the tool.
- Step two: Make sure your primary region is selected (GuardDuty must be enabled on a region-by-region basis).
- Step three: Click “Get started” (screenshot below).
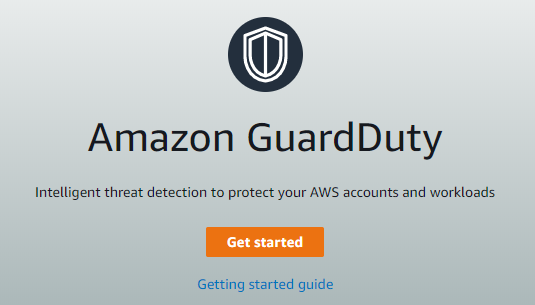 AWS GuardDuty is Amazon’s security monitoring tool.
- Step four: Click “Enable GuardDuty.”
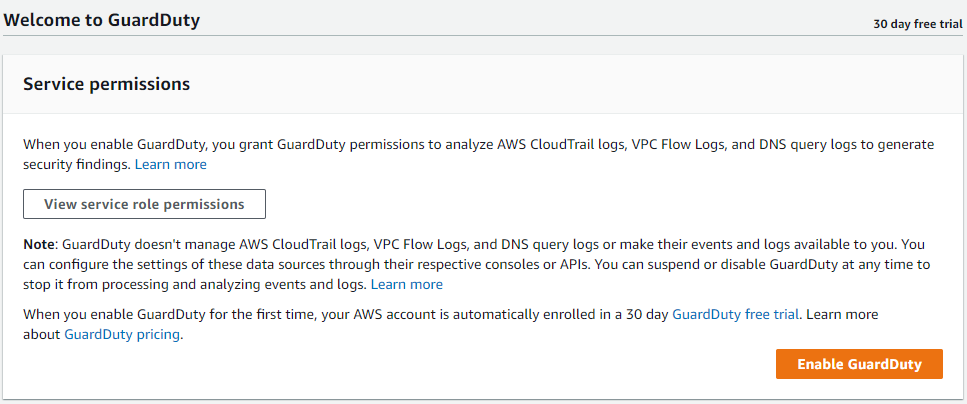 Enable Amazon GuardDuty with a single click per region.
That’s it! Now you’ll start to get events like these sample ones.
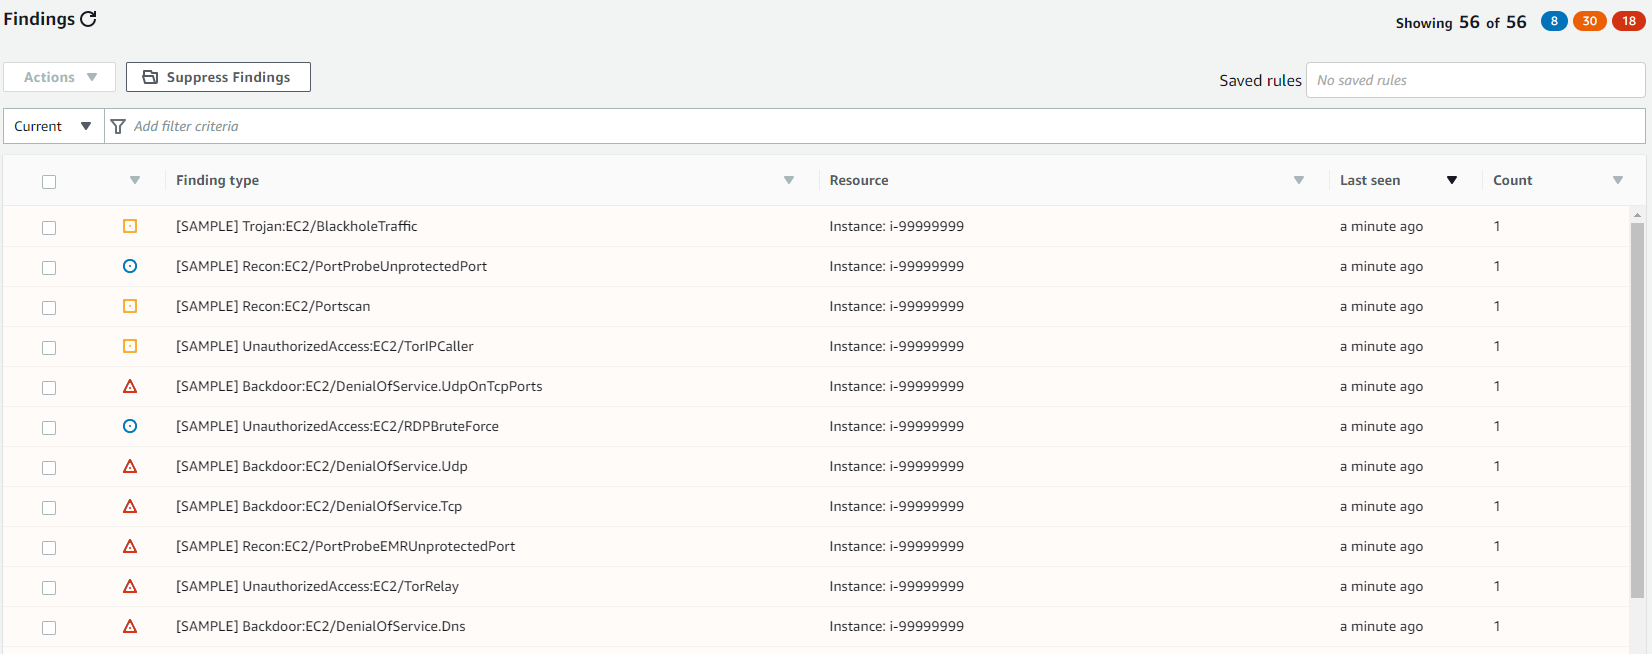
Sample events from AWS GuardDuty
There are a couple things to note.
- You need to enable GuardDuty once for every region you want it to run in.
- You need to enable GuardDuty in every account you want it to run in. If you have multiple production accounts, enable it in all applicable regions in all applicable production accounts.
- GuardDuty does not need VPC flow logs, DNS logs, or CloudTrail logs to be specifically enabled. It works on the underlying data.
- GuardDuty sends findings to CloudWatch Events.
If you want to address findings from GuardDuty, you’ll have to either enable notifications through CloudWatch Events, or you’ll have to check the GuardDuty dashboard regularly. It also has a mechanism to export findings to an S3 bucket so you can connect them to Lambda, query them, or save them.
It’s important to both set up GuardDuty as well as get notifications. If you’re not addressing notifications, you may as well not set it up.
Conclusion
Securing your app thoroughly is extremely time-consuming and labor-intensive. When you're launching for the first time, you shouldn't and don't need to check every box. If you follow the recommendations I've listed here, you can hit the ground running while still being sure your major bases are covered.