This blog is part two of our series on launching an app to AWS.
Other posts in this series:
- Getting started
- Preventive measures (this post)
- App security
- Route 53 and DNS explained
- App automation and optimization
So, your application is ready for production. You’ve taken an inventory of your applications, dependencies, and configuration. Now, you’re ready to create a new AWS account and start launching resources.
Before you launch anything, though, think carefully about some of the actions you're about to take: some of them may be irreversible.
Well, very few things in AWS are actually irreversible. In the worst case, you take the system down, rebuild, and relaunch. By "irreversible actions," what I really mean is “stupid actions.” They’re stupid because doing things the wrong way is more costly—both now and, especially, in the future.
Fortunately, the key to avoiding these costly mistakes is just to be aware of them.
Here are my top 6 recommendations about standing up a new AWS infrastructure. Some will save you money; all will save you time.
| Got any plans for monitoring your soon-to-be-deployed app? Blue Matador is the fastest, easiest way to monitor AWS. Learn more > |
1. AWS Key Management Store (KMS) is there for you. Use it.
AWS KMS is Amazon's out-of-the-box encryption tool. It serves several AWS services, including S3 buckets, DynamoDB, and more.
When I first started with AWS, all encryption had to be done by me. Now they’ve released encryption for EBS volumes, S3 objects, SQS messages, and VPC traffic. The cost is built into the services, the key management is taken care of for you, and all you need to do is to intentionally enable the encryption (which takes like 5 minutes, tops).
AWS KMS is available for the services we list below. I recommend that you enable it on all the ones you use. There’s really no reason not to.
AWS KMS for EBS volumes
EBS encryption must happen at creation time. You cannot change this setting later. All snapshots of encrypted volumes will also be encrypted. You cannot create an encrypted EBS volume from an unencrypted snapshot or vice versa.
The key used to encrypt and decrypt your volumes is managed in Amazon's KMS. The service rotates your keys, keeps backups, and ensures your keys are safe and durably stored. It also works seamlessly with the block device on your EC2 instance—you just mount the volume like you normally would with a non-encrypted EBS volume.
KMS cannot encrypt ephemeral volumes, though. For this reason (and a host of others), I recommend using only EBS volumes.
You can opt to encrypt when creating an EBS volume or when creating an EC2 instance in the AWS console.
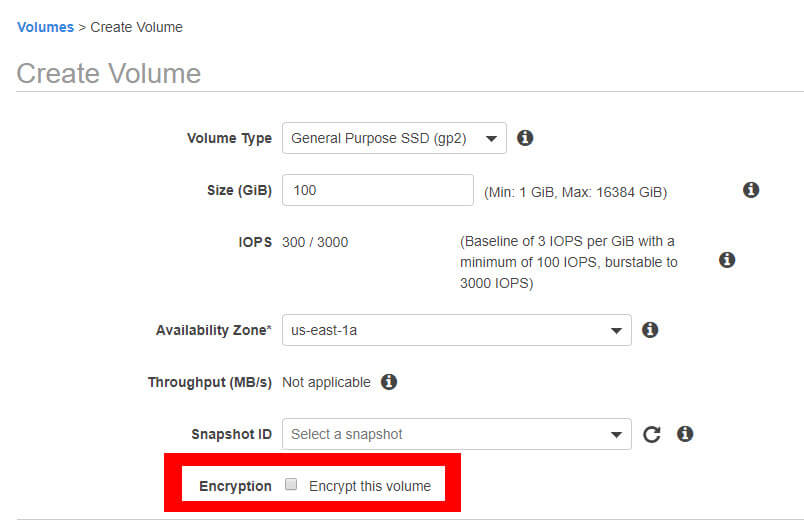
In the EBS service, you can enable EBS encryption in the “Create Volume” wizard.

In EC2, head to the “Add Storage” section of the “Create Instance” wizard to enable encryption.
Similar options are available in the aws-cli using the --kms-key-id argument.
AWS KMS for S3 buckets
This is a misconception. You can’t actually encrypt an entire S3 bucket. You can, however, encrypt individual objects in S3. That’s why this is an irreversible action—adding encryption to all your S3 objects requires iterating through them all and reuploading to S3.
Encryption works with cross-region replicas, versioned objects, and lifecycle rules. To enable encryption on a specific object, just set the option during upload.
Just like EBS, there is no actual difference between the objects or how you interact with them. Also, KMS stores these keys, too, so no worry about losing, rotating, or sharing the keys.
You can use the AWS console or the aws-cli to encrypt your objects. But, more likely, you’ll want to update your code to encrypt objects. The option is available in all languages and recent versions of the S3 library. There is no disadvantage to encrypting every object you have, in all the buckets you have.
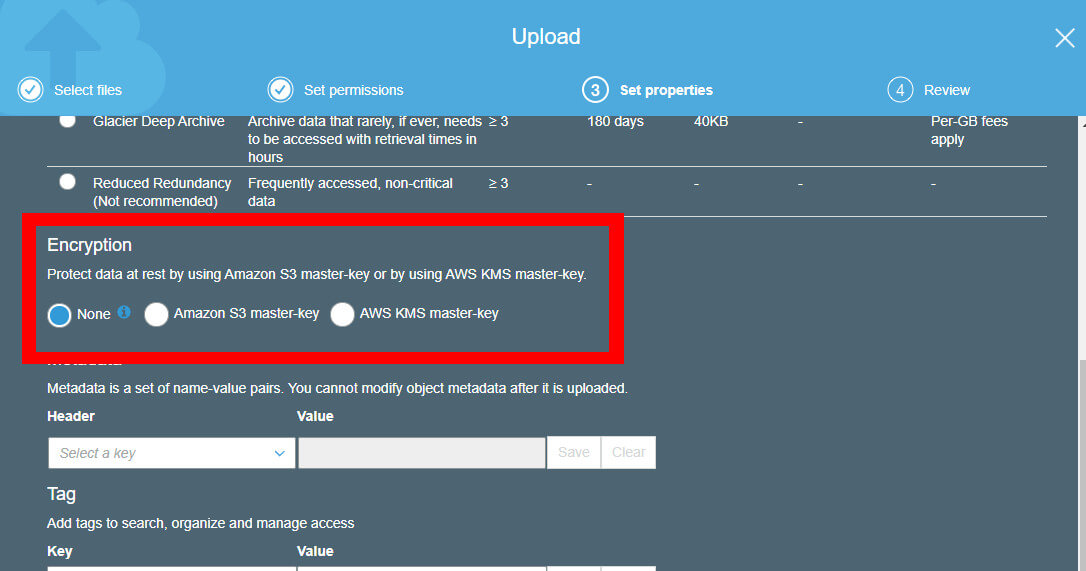
Enable S3 object encryption on the “Set properties” section of the upload wizard in S3.
Similar options are available in the aws-cli using the --server-side-encryption argument.
Other AWS encryption
Without the walkthroughs (it's just as easy on these services if you know the option is available), encryption is available as a built-in, manually enabled option for the following services:
- EFS filesystems
- SQS messages
- DynamoDB
- RDS
- Kinesis streams
- Cloudfront distributions
- ELB
In every case, the encryption has to be enabled at creation time. In every case, it doesn’t change the runtime API or object/message/traffic. It simply adds encryption.
For Cloudfront and ELB, the encryption is using TLS and is done through Amazon Certificate Manager. You should use these, especially since they give out free SSL certificates.
2. Under-provision your EBS volumes
Note: We're specifically talking about your databases, persistent servers, and container nodes. The default 8GB is fine for your other compute instances.
Over-provisioning is so easy. It happens to the best of us. We’re excited about what we’re building, so when we go to release a service, we launch 3 instances or 15 pods for something that has literally no traffic. Compute resources are easy to remedy—storage (EBS in particular) is quite different.
Here's why you shouldn't over-provision your EBS volumes: The first problem is that the cost of the EBS volume is proportional to the size of the volume. If you over-provision, you’re spending money. This is simple math. The second problem is that any snapshots (which you’ll likely take) will incur a proportional price, too.
Then it gets more complicated.
For gp2 volumes (the primary type), you don’t get more IOPS as you grow from 1GB to 33GB. The next graph displays this inverse proportionality. The decrease is due to the minimum of 100 IOPS for all gp2 volumes. Read another way, you’ve got to buy 34x what you’ll probably need in your first 6 months to get any additional throughput, which you probably won’t need for your first year.

IOPS/GB decreases as EBS volume size increases from 1GB to 33GB.
When you over-provision, not only do you not get more throughput or need more size, but you also increase the time it takes to do snapshots. With bigger volume sizes come longer wait times. It also increases the chance that you exhaust your burst balance, exceed the hour threshold, and run multiple snapshots at the same time (assuming you’re taking one an hour, but the principle applies regardless of your snapshot frequency). When multiple snapshots are running simultaneously, it’s a downward spiral from there on performance.
These prior issues aren’t even the worst—it’s the management of a large volume.
If you start small and decide to grow the volume, it’s not that big of a deal. You would take a snapshot, create a new volume of a larger size, swap them out, and extend the filesystem. The planned maintenance period would last a couple minutes at most.
Going from big to small takes much more time and complexity. First, you can’t actually shrink most filesystems. Creating an EBS volume of a smaller size than the snapshot it was created from is disastrous and causes unknown amounts of data loss due to filesystem structuring and disk fragmentation. The only way to shrink a disk is to create a new disk of the appropriate size, and then copy or rsync over all the files. This takes much more time and is incredibly error-prone (if the cp dies because of an SSH timeout, network partition, or swapping).
Let me summarize with this good advice: start with much less than you think you’ll need in the next 1 month. In the worst case, you may lose a couple minutes to upgrade. And that’s even easier if you follow my next suggestion.
3. Use LVM2 on every instance.
If you’re using EBS volumes and Linux, use LVM2. It’s impossible to say how much value this one utility brings with it. It takes about 2 minutes to set it up, and then you’ll be surprised at what it can do later on, even if you don’t take a ton of time to learn about it now. Basically, it creates virtual disks from your EBS volumes. Then, you can do things like:
- Add disk space without taking downtime.
- Stripe volumes for increased throughput.
- Migrate to an encrypted or even an unencrypted disk without downtime (particularly helpful if you didn’t follow my advice above).
- Create a copy of an EBS volume without taking a snapshot.
You may read that list and think, “That will never happen to me.” It may not. For less than two minutes, and no negative impact on performance (striping can actually help), you’ll at least have the option. I have personally done every one of those things and was glad that I thought ahead with LVM2 to help me do it.
Here’s the simple way to get started.
#!/bin/bash

sudo apt-get update
sudo apt-get install lvm2

# mark your “physical volumes” (your EBS volumes)
sudo pvcreate /dev/xvdf

# create a group of physical volumes called a “volume group”. Name it “main”
sudo vgcreate main /dev/xvdf

# create a block device (like a pretend EBS volume) called a “logical volume”. Name it “vol1”
sudo lvcreate -l 100%FREE -n vol1 main

#### LVM DONE! ####

# create an xfs filesystem and mount it
sudo apt-get install xfsprogs
sudo mkfs.xfs /dev/main/vol1
sudo mkdir /vol1
sudo mount /dev/main/vol1 /vol1

#### LVM DONE! ####

# create an xfs filesystem and mount it
sudo apt-get install xfsprogs
sudo mkfs.xfs /dev/main/vol1
sudo mkdir /vol1
sudo mount /dev/main/vol1 /vol1
This code assumes Debian, an XFS filesystem, and that your EBS volume was mounted to /dev/sdf (converted to /dev/xvdf in the OS).
That’s it! From this point on, don’t even worry about LVM. It will just work. Then, in the future, if you need to update anything about your disks, look through the LVM docs to see if you can do it easily (chances are “yes”).
4. Know the different types of security keys.
There are three types of keys that you should pay particular attention to when dealing with AWS. This isn’t rocket science, but it’s also too easy to forget.
EC2 key pairs
Don’t lose them. If you lose them, you’ll have to terminate the machine. AWS will not help you regain access to the server. Doesn’t matter if the server is a random job server or your primary database. It will be gone.
Root account multifactor authentication (MFA)
It’s highly recommended that you enable MFA on your root AWS account credentials. I would take it one step further and use an application like Lastpass to store the MFA token. It will save you from ever losing the MFA and will transfer from phone to phone easily.
Access IDs and secret keys
It’s far more likely that you’ll share these too much than share them too little. These get committed to configuration in Github all the time. There are bots that are constantly on the lookout for AWS credentials on Github because if they can get the credentials, they can launch resources, and mine all the bitcoins. Don’t commit these to code.
5. Use different accounts for production and development.
There is no limit on AWS accounts. You can sign up for a bunch of them. AWS has actually been encouraging it for the last few years for horizontally scaling teams and services.
But there is a balance to be struck here. You could make an AWS account for every EC2 instance—definitely overkill. You could also put everything in a single AWS account—definitely underkill.
To start, I would create a root billing account, a production account, and one development account per developer. The root billing account won’t have any infrastructure in it but will serve as the parent account and cost reporting center. Lock this account down to a select few. The production account will host everything necessary for production, including shared services like email and DNS.
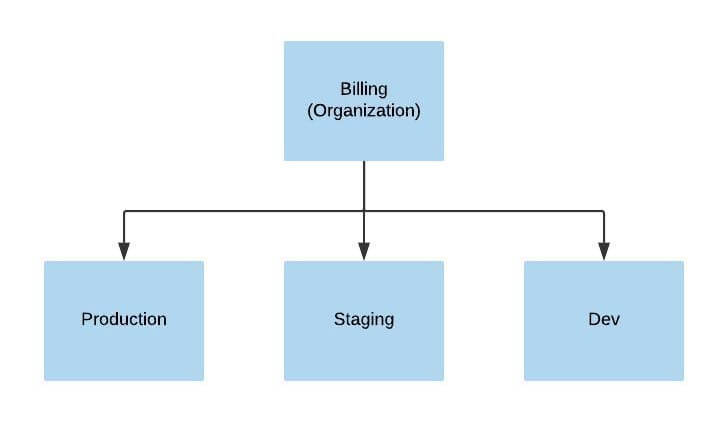
Create 3+ accounts, all in the same organization.
Having few accounts limits your exposure to MFA, credentials, key pairs, VPNs, traffic routing, and more. Yet, with this number, you gain all the benefits of security, stability, disparate service limits, and simple cost-allocation reports.
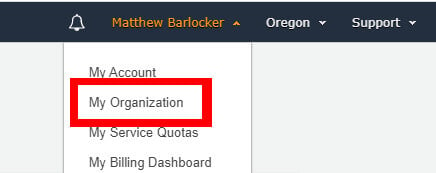
To set this up, start with the billing account. Create a new AWS account like any other. While it won’t contain any infrastructure resources, it is the same as any other AWS account. After it’s created, navigate to the “My Organization” section of the console and set up your organization, including all subaccounts.
AWS has a tutorial on setting up organizations and subaccounts. Here are some screenshots I took of our organization account.
Navigate to the organizations screen from the AWS console.
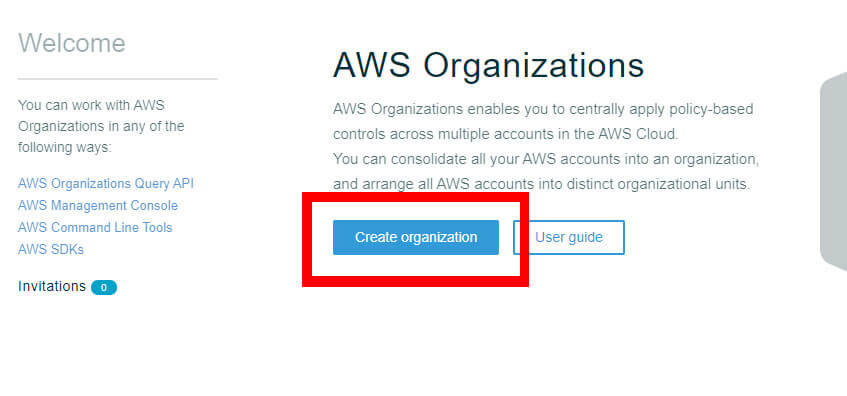
Create an organization to manage multiple subaccounts.
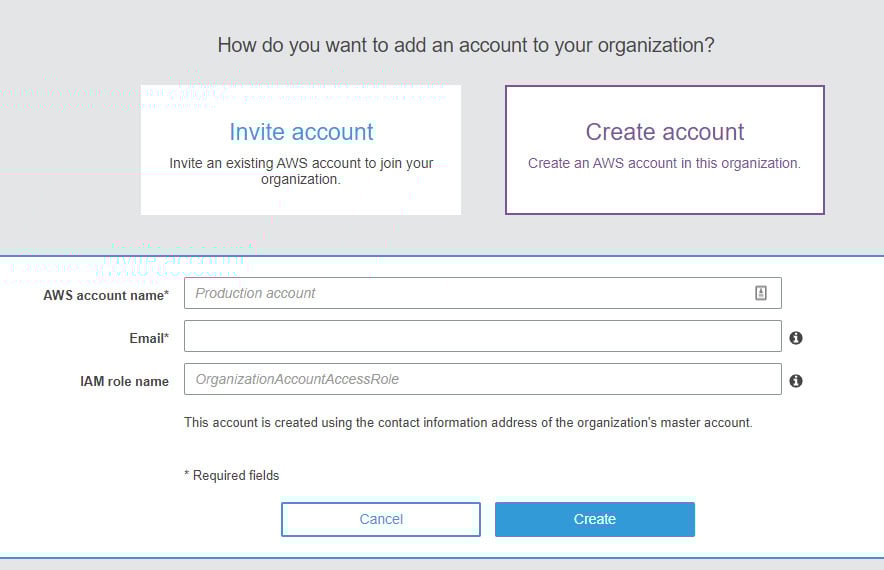
Either create new subaccounts or invite regular accounts to be a subaccount of the new organization.
Isolating production from development, staging, or billing takes minutes, but it will save you in the long run.
6. Record every command you run.
There are tools available (Terraform, Saltstack, Chef, etc.) to create infrastructure in a reliable, reproducible way. Each one of these is great because it manages configuration drift, expands infrastructure as needed, and reduces the manual error that comes with provisioning.
Honestly, you don’t have time to set one of those up right now. At this point, you need to get rolling. There’s a much more pragmatic approach that will help you if your application takes off.
Instead of setting up one of these tools, just create a new git repo and make a file for every type of server. Every command you run on the server gets copied from the repo.
Of all my recommendations, this is the only one that requires you to think about it after configuration is done. Naturally, there will be some drift. Someone will forget to commit a command. Not all commands will be run on all servers. Commands will be out of date. But that’s okay because it’s better than nothing.
Without this git repo, if anything were to happen to your infrastructure, you would start from scratch all over again. At least this method gives you a leg up. It also helps your team members understand what you did, even if not a perfect history.
Summary
Everything can be fixed in AWS with the right amount of time and research. Unfortunately, some problems take a great deal of time and effort to fix once they've occurred. When you take the precautions listed above, you can save yourself a bunch of time and a great big headache.
| If you do wind up messing something up, we're here for you. Blue Matador monitors AWS out of the box and finds your unknowns for you, so we'll let you know what's wrong and what you need to do to fix it. Try it free > |