IAM is the de-facto method of authorization in AWS. Most Kubernetes “Quick Start” guides for AWS do not adequately cover how to manage IAM access in your pods. This blog series will first go over the security issues specific to AWS IAM on Kubernetes, then compare solutions, and then end with a detailed walkthrough for setting up your cluster with one of those solutions.
| If you are interested in a fully managed solution to monitoring Kubernetes in AWS, check out Blue Matador infrastructure monitoring. Learn more > |
Overview
In the first post, we discussed solutions that do not require any extra dependencies for your cluster: IAM access through your nodes, and IAM access using users for each pod. In this post, we will compare kube2iam and kiam, open source solutions that manage IAM access for your pods in a way that allows you to use IAM roles but still adhere to the principle of least privilege.
Click here to read more in-depth blogs about Kubernetes.
Update
March 1, 2019: After sharing this blog post in the #kiam channel of the Kubernetes Slack, some of the other users there led me to these two github issues for kiam and aws-sdk-java. The performance issues I saw are most likely the result of the Java SDK thinking it needs to immediately refresh credentials every API call. This can easily be avoided by setting the --session-duration flag in kiam to longer than 15 minutes. The reason that kube2iam does not have this issue is that the assume role code in kube2iam doubles the default session duration of 15 minutes to 30 minutes, masking the issue. While I am unable to test this in our production cluster, I am convinced that this is the likely solution and would put kiam at least on par with kube2iam as a great solution.
How Does Kube2iam Work?
kube2iam was the first major contender for solving the IAM issue in Kubernetes. The project was started in 2016 and has been widely used in many deployments. It works by deploying a kube2iam pod to every node in your cluster as a DaemonSet. It runs in the host network with privileged security access so it can create an iptables rule on each node to intercept calls to the EC2 metadata api at 169.254.169.254 which is used by AWS SDKs to authenticate with IAM. The pods on each node intercept calls to the API and instead of authenticating directly, will assume roles that are assigned to pods in your cluster via annotations, and respond with the temporary credentials from assuming that role. In this manner, your pods get the access from their annotated roles, and the only permissions needed for your nodes is the ability to assume the roles your pods use. No code changes should be needed if you are already using the default or instance credential provider chain in your AWS clients.
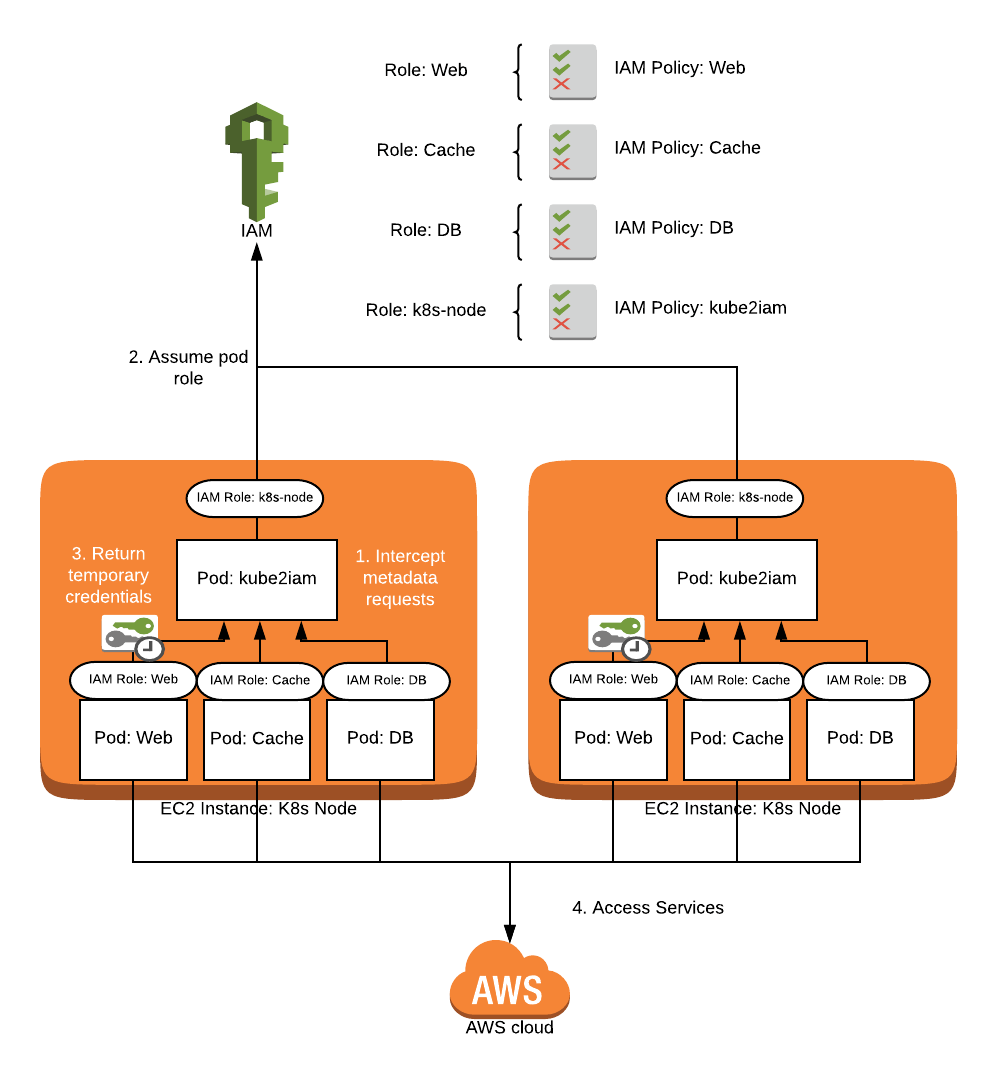
IAM Access using kube2iam
How Does Kiam Work?
kiam is heavily inspired by the kube2iam project and was started in 2017. It strives to solve some perceived scaling and security issues that were present in kube2iam at the time. kiam splits its operation into two pieces: the server and the agent. The agent runs as a DaemonSet and intercept EC2 metadata traffic, similar to kube2iam. Where things are different is that the agent does not actually communicate with IAM directly -- instead it makes calls to the server component.
The server component is essentially a prefetched cache of temporary IAM authorization used by the agent. In this manner, you can run the kiam server on a subset of nodes (usually your master nodes), further restricting access to IAM in your cluster. By prefetching credentials, it also reduces calls to IAM overall and reduces latency for most authorization calls seen by pods because you do not usually have to wait for the authorization call to take place initially and when temporary credentials have expired. The benefit is twofold: an influx of initial IAM requests are more easily handled, and normal operation should be faster on average. No code changes should be needed if you are already using the default or instance credential provider chain in your AWS clients.
I highly recommend reading this blog post by the creator of kiam for an in-depth look at the motivation behind the project.
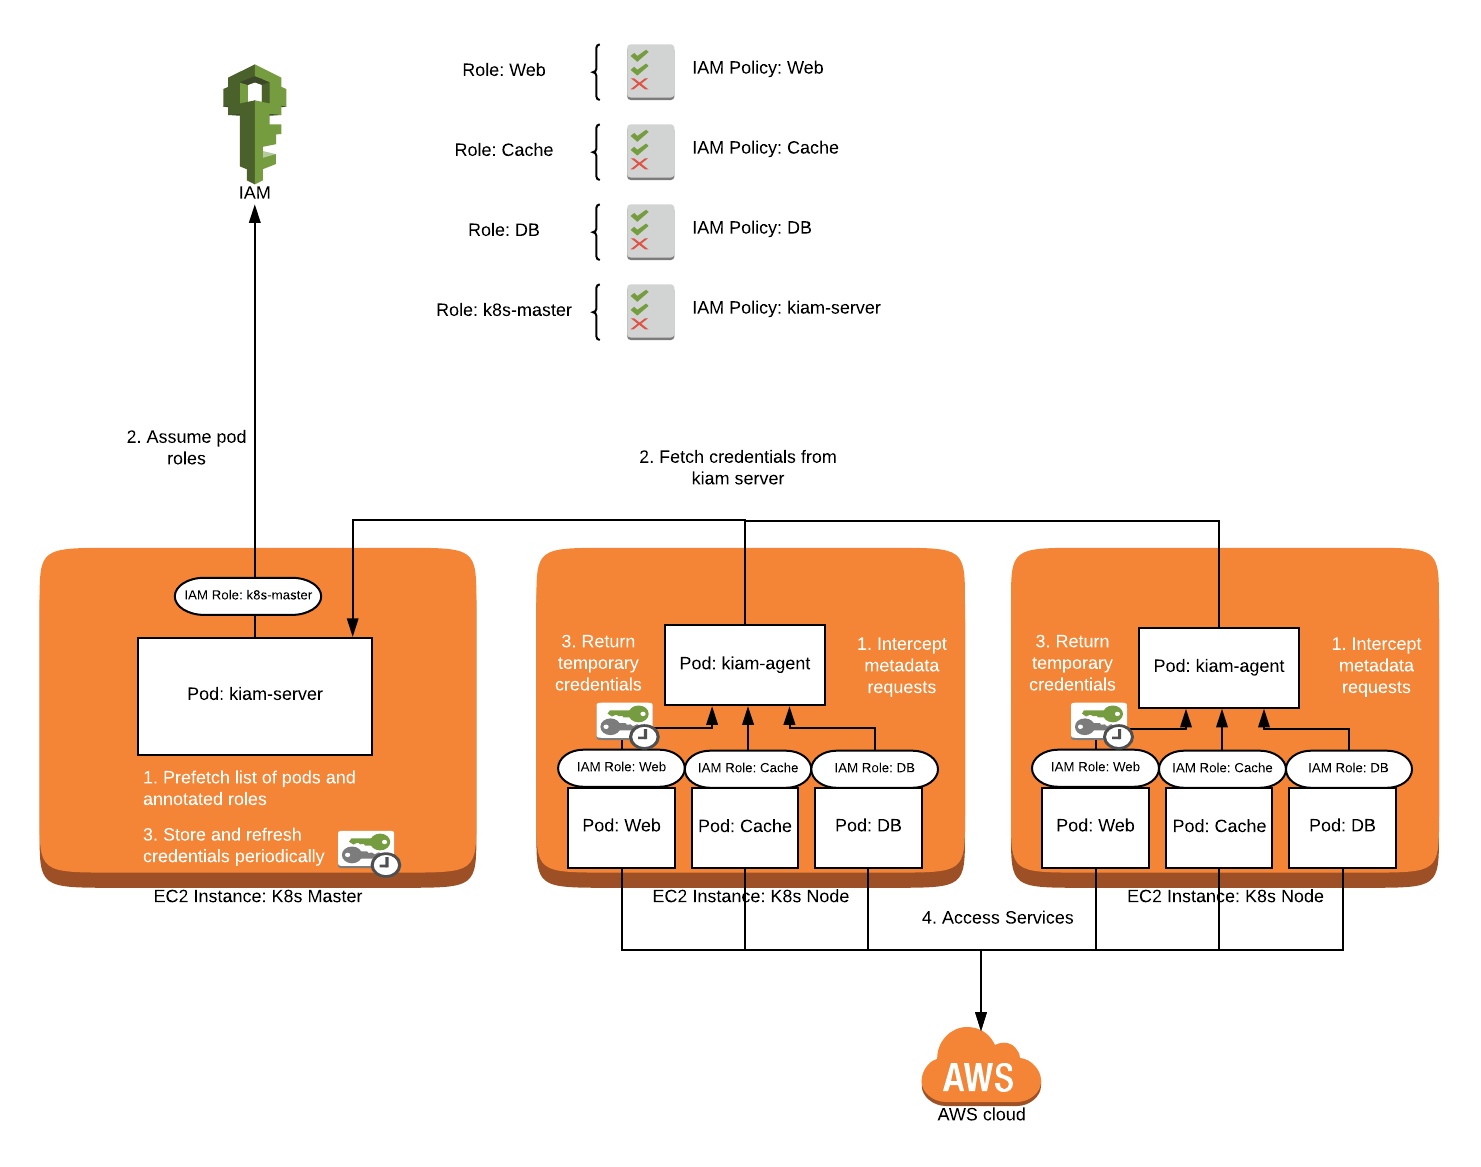
IAM Access using kiam
Setup
 Both kube2iam and kiam have a similar setup process that varies mostly due to the vastly different architecture of each solution.
How to Set Up Kube2iam
The setup process for kube2iam is very simple:
-
Create roles for your pods to assume
-
Add permission to your Kubernetes nodes to assume these roles
-
Set up RBAC for kube2iam
-
Deploy the kube2iam DaemonSet
-
Annotate your pods with iam.amazonaws.com/role: <role arn> and apply changes
-
Clean up your previous IAM access method once you have verified access via kube2iam
While the steps are simple, you are very likely to run into issues when setting up kube2iam. For one, you will have to set the --host-interface argument on the kube2iam pod config to match the network layer your cluster uses. It is easy to skip this step in documentation, and vital to get things working. Also, you may have a hard time debugging issues with IAM permissions themselves. While you can look at logs in the kube2iam pod, there is no indication on your application pods that something may be wrong with IAM authentication via kube2iam, and it can be tricky to track down issues properly using logs alone.
How to Set Up Kiam
The setup process for kiam is a little more involved because of some design decisions made to enhance the security of the project.
-
Create roles for your pods to assume
-
Add permission to only the nodes that will run the server (usually master nodes) to assume these roles
-
Annotate your pods with iam.amazonaws.com/role: <role name> and apply changes
-
Annotate your namespaces to allow role assumption in each namespace with iam.amazonaws.com/permitted: ".*". This is a required step that is useful in multi tenant clusters and uses regular expression matching on role names.
-
Configure TLS for the agent-server communication. This step ensures that only the agents can communicate with the server to get credentials.
-
Create the server RBAC resources
-
Deploy the server DaemonSet
-
Deploy the agent DaemonSet
-
Clean up your previous IAM access method once you have verified access via kiam
Once again, you will need to set the --host-interface flag according to your network implementation. It is also important to double check the namespace annotations to ensure your roles are permitted in the namespaces your pod runs in. Troubleshooting in kiam seems to be a little easier than in kube2iam, notably because of the inclusion of pod events when IAM issues are encountered. This makes debugging your application’s access much easier. The TLS configuration step alone can be quite a burden for an operator of a small cluster if you follow the recommendation to use Vault or cert-manager to automate certificates. If you have many roles to manage across multiple namespaces, it can be hard to remember to properly configure the namespace regexes as well.
Winner: Kube2iam
When evaluating how easy it is to get something set up, you must consider both the “test” setup and the production setup. Setting up kiam is considerably more time consuming for a production environment because of the TLS configuration and forced namespace configuration. Kube2iam has a simpler architecture that takes much less time to get running in production.
Security Features
 In both cases, kube2iam and kiam address the main security issue of restricting IAM access for pods. Each has features that further enhance the security of your IAM usage to varying degrees.
Kube2iam Security Features
The architecture of kube2iam improves overall security by restricting IAM access. The nodes only need permissions to assume the IAM roles that your pods will be using, so a malicious pod would have to know in advance which IAM roles to assume, and have that set in its annotations. This is considerably better than using the node role to have all possible pod permissions, or using IAM user keys which can be accidentally leaked.
Namespace restrictions are supported in kube2iam such that you can configure a namespace to only allow certain roles to be assumed for pods in that namespace. This an extremely useful feature in multi-tenant setups. It can be enabled with the --namespace-restrictions flag in the agent config, and is not enabled by default.
Kiam Security Features
The architecture of kiam restricts IAM access even more than kube2iam. Only the nodes running the server (usually the master nodes) need IAM access directly. Worker nodes only need the ability to connect to the server in order to get delegated IAM access. This seems like an improvement especially for multi-tenant architectures or for large clusters where you want to limit IAM access as much as possible to reduce the impact of a compromised node.
TLS between the server and agent is also required to protect the integrity of the API. Since this is only required because of the split architecture, it does not “add” security as much as prevent a security hole introduced by the architecture. Nevertheless, the fact that this was not omitted is a testament to how security-minded kiam is.
Namespace restrictions are not only supported but required in kiam. Any namespace where you want pods to assume a role must configure the list of allowed roles with regex. While it is an extra step, it forces you to evaluate your IAM usage even in small setups.
An additional feature that is not present in kube2iam is restricting EC2 metadata api access. By default, kiam denies access to other metadata api paths that can allow pods to discover information about the node they are running on. It is common for monitoring tools in particular to use the metadata API to associate your Kubernetes resources with AWS resources. This can be configured via the --whitelist-route-regexp flag. To allow all routes use .* as the value.
An additional layer of IAM security is available in the server if you set the --assume-role-arn flag. This specifies a role that the server pods will assume before they handle IAM requests for the agent. Basically, this means that the nodes the server runs on only need permissions to assume a single role! That role then has the permissions to assume all of your other roles. If it sounds like you’ve gone down the rabbit hole, it’s because you have.
Winner: Kiam
It should be no surprise that kiam is the winner here. It was designed from the outset with specific security issues in mind. Fewer nodes will have the ability to assume IAM roles. Requiring namespace restrictions is a good practice, even if you do not have a multi-tenant cluster. The ability to restrict the metadata API is a nice bonus for kiam. While you would not be running “insecurely” with either solution, I find comfort that kiam puts in the extra effort in this area.
Extra Features
 While security is top of mind when evaluating these solutions, there are other features that may impact your ability to use each solution. Support for your network layer, cluster configuration, and ability to change certain options will have an impact on which solution works for you.
Kube2iam Features
As a slightly older and more widely used project, kube2iam has more options than kiam in general. The documentation for the options is very thorough, and all easily found in the README.
The README indicates support for the following network implementations:
-
Calico
-
kops (on kubenet),
-
CNI
-
EKS without calico/amazon-vpc-cni-k8s
-
weave
-
flannel
-
kube-router
-
OpenShift
-
Cilium
The --auto-discover-default-role and --default-role can help with migration by letting kube2iam default to a certain IAM role if a pod does not have one specified. In production, I would not rely on this mechanism because it defeats the purpose of using kube2iam in the first place.
Some options such as --auto-discover-base-arn, --base-role-arn, --iam-role-key, and --namespace-key allow you to customize your pod and namespace configuration. Auto-discovering the base arn should honestly be on by default, and the key name options seem pretty frivolous in general. There are also many options for customizing the log format, how the agent runs, and the length of the IAM session.
One option that seems very interesting is --use-regional-sts-endpoint, which configures the agent to use the regional STS endpoint instead of the global one if you also set the AWS_REGION environment variable. This can reduce latency for IAM requests generally, but also ties you to one region for authentication.
Cross-account roles are supported as expected if you specify the full ARN of the role in your pod annotation.
Kiam Features
kiam has fewer options in general and they are not documented well. The flags are all easily read in the go source code for the agent and server, but should really be included in the README.
The README indicates support for the following network implementations:
-
amazon-vpc-cni-k8s
-
cni-ipvlan-vpc-k8s
-
weave
-
calico
-
canal
-
kube-router
-
kops (kubenet)
On the agent, the only non-required flag you will likely need is --whitelist-route-regexp. As explained in the previous section, this lets you restrict access to the metadata API outside of IAM authentication calls.
Unlike kube2iam, the server for kiam has several options for tuning performance based on your cluster size. The --fetchers, --prefetch-buffer-size, and --sync options can be modified for performance while the --session-duration and --session-refresh allow you to specify how long IAM tokens are valid for and how soon to refresh them before expiration.
One of --role-base-arn or --role-base-arn-autodetect must be set so that your named roles can be turned into valid arns. This is odd considering you can just use a fully-qualified ARN in your pod annotation, but will generally make your config easier to read (unless you use cross-account roles).
Cross-account roles are supported as expected if you specify the full ARN of the role in your pod annotation.
Winner: Tie
While the number of options for kube2iam is greater than for kiam, I do not subscribe to the philosophy that more options is necessarily better. Both solutions offer similar options except for a few that are mostly unique to their implementation.
I think kiam struck the perfect balance between configurability and safety. My only real criticism is that there is basically no documentation for what the options are or how they would affect the server.
Some kube2iam options are useful when migrating from your current solution (--default-role, --auto-discover-default-role) but both of them should be disabled once everything is set up.
Performance
When deploying any solution that will affect many of your production application, performance has to be considered. I always recommend having an application metric to measure performance with so you can get a sense for the real impact of a change. I compared performance using the following metrics that we send to Datadog:
-
app.diagnose.key_age: measures the delay in processing on our back end system, measured in seconds
-
kubernetes.cpu.usage.total: measures the total cpu usage in our cluster in cores (5 cores = 5000m)
-
kubernetes.network.rx_bytes/tx_bytes: measures the total amount of data being received (rx) or transmitted (tx) from nodes in the cluster
The cluster I tested performance on has 3 c4.large masters and 6 m4.large nodes. The application running on this cluster has many pods with occasional IAM access, and one DaemonSet in particular that reads heavily from DynamoDB.
Kube2iam Performance
Kube2iam had essentially no noticeable impact on my performance metrics. In order to get all pods actually using kube2iam instead of their cached IAM credentials from the node, I had to do a rolling release of almost every pod on the cluster, which caused a spike that is consistent with our normal releases. The approximate time of the release of kube2iam and all of the pods is 11:35.
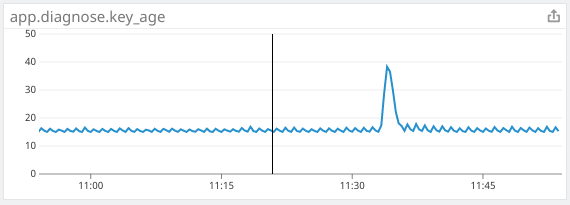
The application metric is steady after the expected release spike
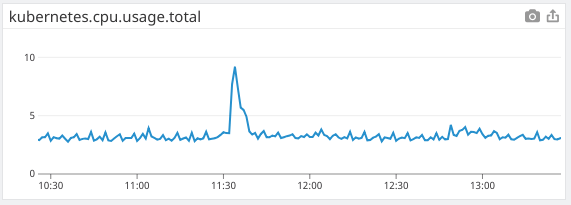
Cluster CPU usage is consistent after the release

Cluster Network data is consistent during the release
Kiam Performance
I was surprised to find that kiam had immediate negative impacts on my cluster. I actually had to scale up our key component that does heavy reads from DynamoDB because the calls to kiam slowed it down so much, and had to go into emergency mode for a while to avoid taking any downtime. I attribute most of the issues with kiam to its architecture, and what I suspect is a bug in the response returned from kiam. I immediately noticed a ton of traffic going to both the kiam agent and server to look up the cached roles.
The rolling release of pods occurred at 17:37, and at 17:45 more critical pods were added to compensate for the slowdown. I am also including additional graphs of metrics to show that kiam definitely is the cause of the CPU increase, as well as graphs from cloudwatch to show the effects on the master nodes.

The application metric shows a dramatic slowdown in processing speed as requests got backed up. I had to double the number of consumers to keep up. After the initial issues, overall processing was about 2x slower.
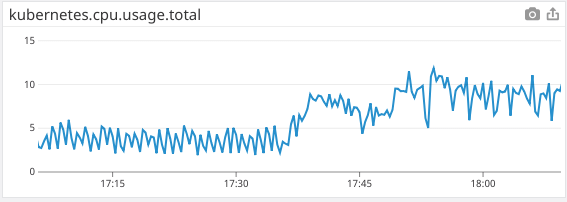
Cluster CPU usage increases as more pods are restarted to begin using kiam. A second increase happens when I double the number of critical pods to keep up with the slowdown.
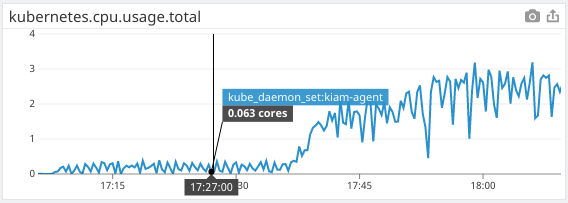
kiam agent CPU usage
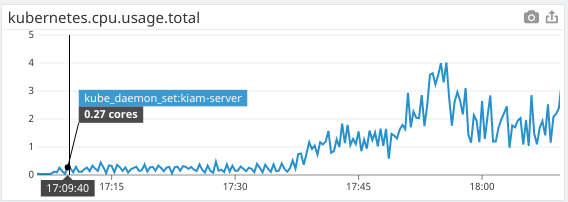
kiam server CPU usage

Cluster network data doubles when kiam is running
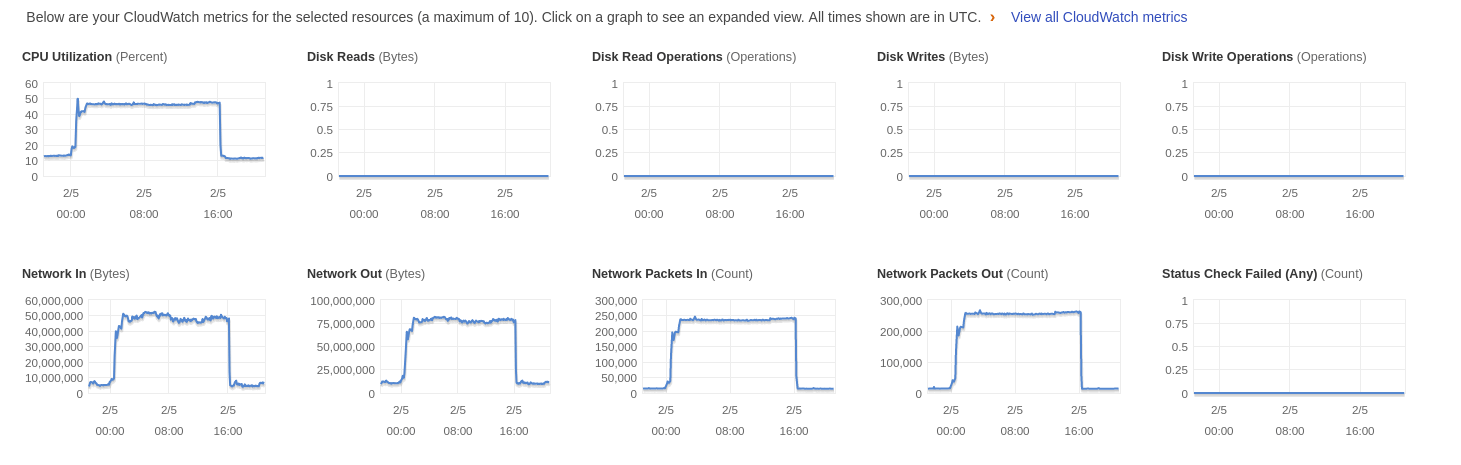
Cloudwatch metrics for one of the masters while kiam is running
Overall Winner: Kube2iam
I was ready to declare kiam the winner when I initially wrote up the comparison. It has more security features and I really liked the idea of prefetching credentials, caching them in the server, and isolating the assume role permissions to just the masters.
Once I actually installed both solutions in production, however, it was clear that kiam’s architecture is a liability rather than an asset. I tried changing some of the server flags to help with performance, and asking for help in the #kiam slack channel but was ultimately forced to give up and use kube2iam.
The setup for kube2iam is significantly easier than for kiam. It meets the security needs I have in my single-tenant cluster. It does not affect my application performance negatively at all. I encourage you to try both solutions in a controlled environment to see which works best for you, but remember to load test kiam.
In the next two posts I do detailed walkthroughs for setting up kiam in a production cluster (including steps for automating certificate management with cert-manager), followed by a post for setting up kube2iam in production.